FAQs About Pear Deck: Cool Things You Can Do

Pear Deck is easy to use, but the potential for how to use it is endless! Want to learn some cool things you can do to take your Pear Deck activities to the next level, like embedding websites and adding audio?
Here are some of the frequently asked questions about getting creative with Pear Deck features to inspire your next Deck, along with links to the corresponding Knowledge Base articles.
FAQ #1: How do I embed a website?
If a site is both secure (https://) and embeddable, then you can bring the website inside your Pear Deck session using the Website Slide! With Website Slides, students can interact with the content without leaving your Pear Deck presentation.
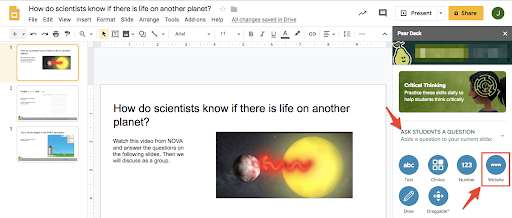
When building a Pear Deck, create an interactive web slide by selecting the Website question type from the Sidebar.
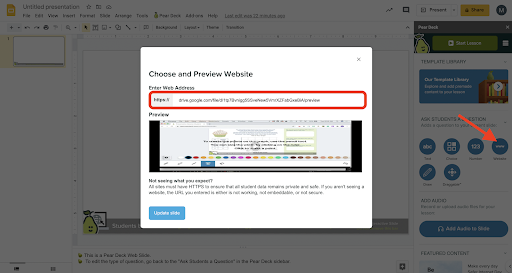
- Simply follow the prompts to add the site link. If your website is embedded properly, you’ll see a preview of it in the window.
- If the site doesn’t show a preview, that means the web address cannot be embedded because it is not secure or the site creator has not made it embeddable.
Once you’ve added the Website interactive footer to your slide, you won’t see the site on your slide until the Session is launched. Once the Session is live, students will be able to see and interact with the content on the website in the Student View.

Additional questions? Read our help article, Embed Websites and Activities in your Pear Deck, for more detailed instructions and ways to troubleshoot links that are not embeddable.
FAQ #2: How do I embed a video in Pear Deck?
For videos to display on Student View:
To allow students to control the video on their screens, embed your video into a Website Slide (see above). Students will see both the contents of your slide and the embedded video on their screen.
You can embed a video from a source like YouTube by following these steps in our Knowledge Base, or you can save your own video to Google Drive and embed for students to watch.
To add your own video:
1. In your Google Drive, click on the video to open it.
2. Click on the more actions button (three dots), and select Share.

3. Change the share settings so anyone with the link can view it.
4. Click on the more actions button, and click on Open in a new window.
5. In the new window, click on the more actions button, and click on Embed item.
6. Highlight only the URL address within the embed code.
7. Using a Pear Deck Website Slide in your Google Slides, paste the link in the URL window.

For videos to display on the Projector View:
To play the video on Projector View on a screen in front of the class or in a videoconferencing platform, add the video directly to your slide. You can learn how by following these step-by-step instructions on our Knowledge Base.
FAQ #3: How do I add audio to my slides?
Pear Deck’s Add Audio feature lets you record or upload audio files to lessons and enables students to listen to those clips from their own devices. Adding audio to a Pear Deck slide is simple to do:
- On the Pear Deck Sidebar, click the Add Audio to Slide button.
- In the Sidebar window, click Record to capture new audio, or Upload to add a pre-recorded audio file from your computer. Pear Deck can support .mp4 files no larger than 20MB.
- When you are satisfied with the recording, click Save Audio to Slide.
- When you're done, click the red Add to Current Slide button to confirm.
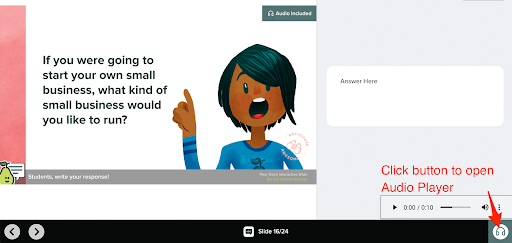
Once the Session is live, students will be able to play the audio in Student View simply by clicking the headphones at the bottom of the screen.

To learn more about Add Audio and get answers to other questions you might have, read the help article on adding audio recordings to your slides.
FAQ #4: How do I open Reflect & Review and share the link with students?
In Reflect & Review, you and your students can view question responses by individual students after a Session ends, offering and receiving feedback as well. What’s great about Reflect & Review is you don’t have to open anything. It opens automatically after a session has ended, allowing you to seamlessly flow between the in-class session and the after-class review.
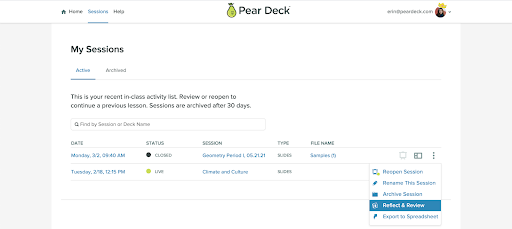
You can still access Reflect & Review after you have saved and ended a session by copying and sharing the link with students. For past sessions that are already closed, go into More Actions (the three vertical buttons) and select Reflect & Review.

Visit our Knowledge Base to learn more about accessing Reflect & Review immediately after a class session or at a later time.
FAQS About the Pear Deck Power-Up
The Pear Deck Power-Up enables your videos, animations, and GIFs to play at full resolution when you present using Google Chrome and Pear Deck for Google Slides. Just install the free Power-Up Google Chrome extension to get started.
Note: Only you, the teacher/presenter, need to install the Power-Up extension on your Chrome browser. Students do not need to install it, and it works automatically for any student who joins your sessions.
Here are some presentation instructions to keep in mind to enable the Power-Up correctly:
- Present from Google Slides with the Pear Deck for Google Slides Add-on by clicking Start Lesson in the Pear Deck Sidebar. (Trying to present from your Pear Deck Home or Sessions Menu will cause an error.)
- Use a keyboard or mouse clicks to move your presentation forward. (If you’re using the arrows on the navigation bar within Pear Deck, it will skip over any animations/transitions as the arrow automatically moves the presentation to the next slide.
- If you want GIFs and videos to play on the Student View, add them to a Website slide. The Power-Up only enables GIFs and videos on Projector View.
Looking for more learning resources to get started with Pear Deck?
Check out one of our on-demand webinars or self-paced training Decks made by Pear Deck Coaches! We also have a How-To Handbook specifically for remote and asynchronous learning.
More questions?
You can always find step-by-step instructions in our Help Videos and Knowledge Base as well.
.png)


